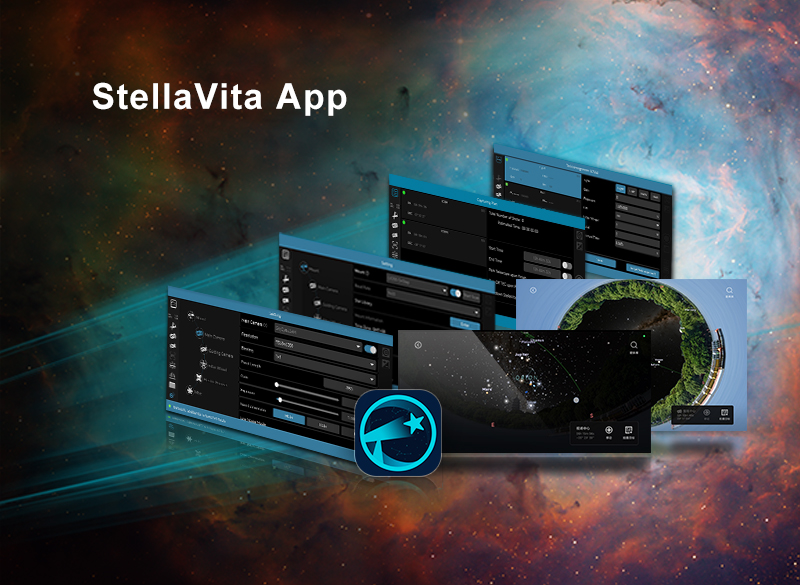
StellaVita, the smart astronomy wireless controller, offers a variety of shooting modes, from single-frame shooting and video shooting to scheduled shooting, as well as auxiliary functions such as polar axis alignment, autofocus, guiding, and star-seeking.
StellaVita App is an astrophotography app crafted specifically to offer remote Wi-Fi camera control for beginners and professional astrophotographers. It offers seamless control of multiple brands and types of astrophotography equipment: equatorial mounts, electric focusers, astrophotography cameras and accessories.
This blog will introduce the interface overview of different modes and key functions in the specific shooting process, helping StellaVita beginners quickly master the StellaVita App for astrophotography.
StellaVita mainly supports 3 major shooting modes:
- Single-frame shooting mode: Suitable for quickly capturing a single exposure image, which is convenient for parameter adjustment and composition.
- Video shooting mode: Real-time display of the video stream captured by the main camera, suitable for debugging and short-term recording.
- Scheduled shooting mode: Supports preset shooting plans and multi-target tasks, suitable for long exposure and sequence shooting.
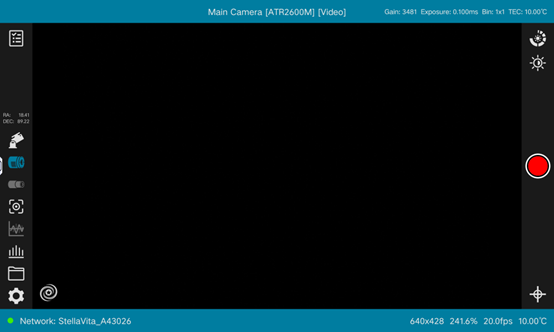
Single-frame Shooting Mode
Single-frame shooting is the default shooting mode of StellaVita, suitable for quickly capturing a single exposure image, which is convenient for parameter adjustment and composition.

1. Interface display:
The central area displays the image being shot in real-time. The top status bar displays
"device type, device model, shooting mode" in the center, and the rightmost side displays
the main camera’s gain size, exposure size, Bin value, and cooling status (only displayed
for cooled cameras). The bottom status bar displays the resolution size of the captured
image, image zoom ratio, and camera sensor temperature on the rightmost side.
The right
control bar allows quick setting of the main camera’s gain, exposure, Bin, and cooling
parameters, and detailed adjustments can also be made through "Setting" – "Main
Camera Setting".
2. Shooting operation process:
① Click the main camera working interface button on the left toolbar of the main interface to select single-frame shooting.
② After clicking the shooting button on the right control bar, the image captured by the main camera will be automatically downloaded and saved to the device (the save path is usually in the DCIM/ToupTek/image directory).
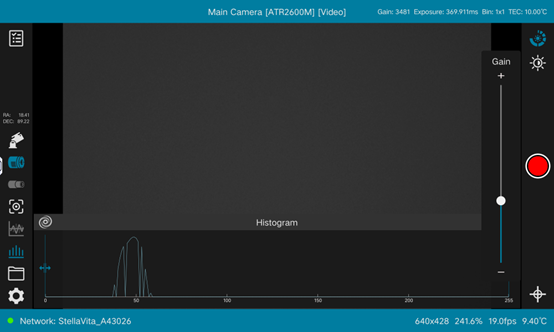
3. Image operation:
- Histogram: The histogram sub-window can be opened through the left toolbar to manually or automatically adjust the histogram sliders.

- Zoom and move: Support for gesture zoom and move, making it convenient to observe local details of the image.
- Crosshair display: Click the control crosshair button to add auxiliary marks in the central display area to help locate the center of the frame.
Note:
- Please ensure that the main telescope focal length is set accurately before shooting to avoid affecting image resolution speed and accuracy.
- If in polar axis alignment or autofocus status, you need to exit the corresponding function before switching to single-frame shooting mode.
Video Shooting Mode
The video shooting mode is used for continuous collection and real-time display of the main camera’s video stream, suitable for debugging and short-term shooting.
1. Interface display:
The central area displays the real-time video being shot. The top title bar displays "device type, device model, shooting mode" and the rightmost side dynamically displays video-related parameters, such as resolution, frame rate, gain, and exposure. The bottom status bar displays the resolution size, zoom ratio, frame rate, and camera sensor temperature of the video shot by the main camera on the rightmost side.
2. Operation process:
① Switch to video mode. If currently in single-frame or scheduled shooting mode, you need to reselect the video option.
② Adjust real-time parameters to obtain the best image effect and click the record button to start recording. After recording is completed, the video is automatically saved to the device (the save path is usually in the DCIM/ToupTek/video directory).
3. Image operation:
The video mode supports video histogram, gesture zoom, and crosshair display to help with composition and parameter adjustment.
Scheduled Shooting
Scheduled shooting mode allows presetting multiple shooting targets and tasks. This mode is suitable for long exposure and sequence shooting.
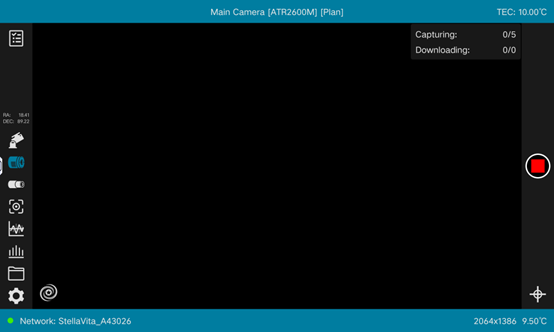
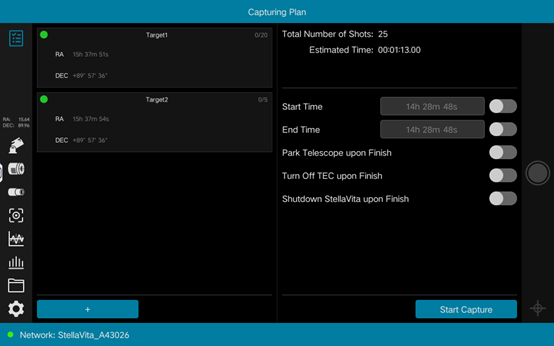
1. Interface display:
The scheduled shooting main interface displays the image being shot, with the shooting
progress and download progress displayed in the top right corner. The bottom right corner
displays the resolution size of the main camera or the image being shot, the zoom ratio of
the image displayed on the screen, and the main camera sensor temperature.
Scheduled
shooting includes three parts: overall configuration, target configuration, and task
configuration.
① Overall configuration: Set the overall start and end times of the shooting. You can set automatic home positioning, TEC cooling off, or shutting down StellaVita after shooting is completed.
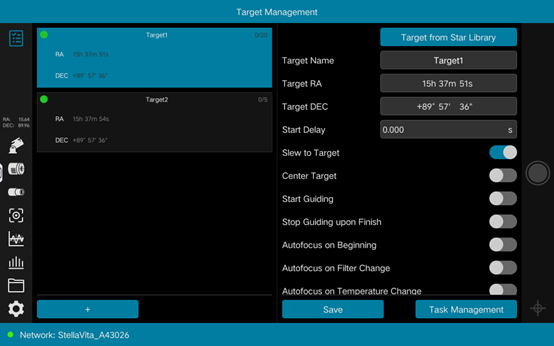
② Target configuration: Set the name, RA (right ascension), DEC (declination), delay, automatic centering, guiding, autofocus, etc., for each shooting target. RA and DEC can be selected from the Star Library.
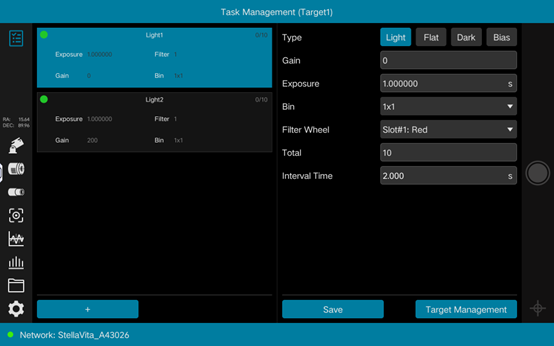
③ Task configuration: Subdivide the shooting tasks for each target (Light, Flat, Fark and Bias frame). Configure the corresponding gain, exposure, binning, and filter wheel position, and set the number of shots and the interval between them.
2. Configuration steps:
① Plan Creation: Click the scheduled shooting configuration button on the left toolbar to enter the overall configuration interface and set basic parameters such as the total number of shots and estimated time consumption.
② Target Setup: In the scheduled shooting target configuration interface, select or create a shooting target. You can select targets from the star library to automatically fill in the right RA and DEC.
③ Task Assignment: For each target, set specific shooting tasks (such as Light, Flat, Fark and Bias frame), and configure corresponding parameters (gain, exposure, Binning, filter position, number of shots, and intervals).
④ Execution of Shooting: After completing the plan, click the shoot button to start the task. The shooting progress and download progress will be displayed in real-time in the upper right corner of the central display area, and the completed images will be saved in the DCIM/ToupTek/sequence directory.
Note:
- The scheduled shooting process supports histogram stretching, central screen area zoom, moving, and opening crosshair assistance for composition.
- The scheduled configuration supports offline setup. If the device parameters do not match the configuration, the system will remind you to check for errors with a red border.
Polar Axis Calibration
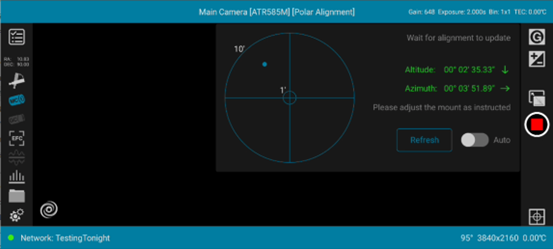
Polar axis calibration analyzes the images captured by the main camera, using three-point calibration and single-shot calibration to guide the adjustment of the equatorial mount’s azimuth and altitude angles, ensuring stable tracking of celestial bodies.
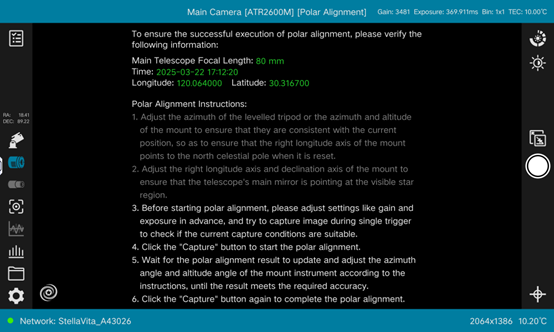
1. Interface display:
During calibration, the main interface displays the captured image, with the upper right
corner showing the polar axis calibration step-by-step instructions and the calculated
result curve chart.
The right control bar allows adjustment of the main camera’s gain
size, exposure size, setting the start/end of polar axis calibration, etc.
2. Calibration process:
① Before starting, please ensure the following operations are completed:
- Calibrate the equatorial mount’s time, geographic location, and main mirror focal length;
- Adjust the equatorial mount’s RA and DEC to point to the visible sky area;
- Ensure that the main camera can capture an image containing several celestial bodies with suitable contrast under the current parameters.
② First, start the three-point calibration. Capture and analyze images at the equatorial
mount’s initial position, 15° rotation, and 30° rotation to determine the initial deviation.
③
After completing the first adjustment of the equatorial mount’s azimuth and altitude, enter
the single-shot calibration. Based on the initial calibration results, repeatedly capture
single images, gradually optimize adjustments, until the deviation meets the requirements
(generally less than 2 arcseconds for the target).
Autofocus
Autofocus adjusts the electric focus position to make the captured star points clear and sharp.
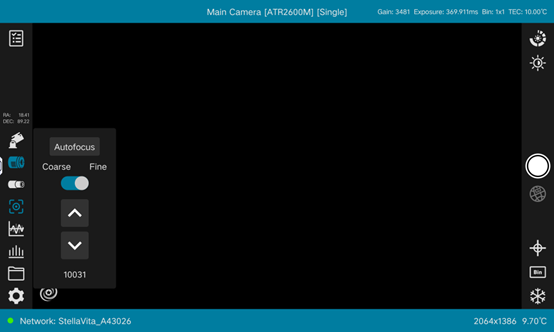
1. Interface display:
The autofocus interface displays real-time images and focus curves, with the top displaying the current mode and camera parameters. The right control bar displays related function keys, including setting the main camera gain, exposure, starting/ending autofocus, exiting autofocus, crosshair display/hide, Bin settings, and camera cooling.
2. Operation process:
① Call up the electric focus control panel, manually adjust to the initial focus area, and
ensure that the captured image contains a bright star as the target celestial body.
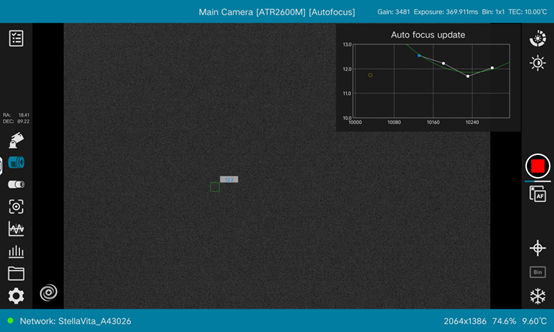
②
Initiate autofocus, the system generates an autofocus curve chart through multi-step
movement and image analysis, with white points, blue points, and dashed lines representing
historical, current, and initial states, respectively.
③ Based on the fitted curve
results, automatically control the electric focus to move to the best focus position and
feedback the successful focus information.
Note:
- Before starting autofocus, it is recommended to set a higher gain (such as 1000) and a shorter exposure time (0.2s to 0.5s) to obtain brighter images with short exposures.
- Appropriately reduce the main camera gain and increase the exposure time (for example, gain 200, exposure time 3s to 5s) to reduce the possibility of the subsequent focusing procedure taking noise as reference star points, thereby increasing the success rate of autofocus.
- Based on the actual situation of the telescope’s focusing seat and the electric focus, reasonably set the electric focus’s movement step size and backlash compensation to ensure precise autofocus.
Star Seeking
The star seeking function uses the main camera to capture images and equatorial mount control to achieve precise positioning of target celestial bodies, providing assistance for subsequent shooting. Before precise star seeking, it is necessary to complete the polar axis calibration and zero-point calibration of the equatorial mount to ensure positioning accuracy.
1. Equatorial Mount Zero Point Calibration:
Utilize single-frame shooting and image analysis to synchronize the current image center’s celestial coordinates with the equatorial mount, achieving zero point correction.
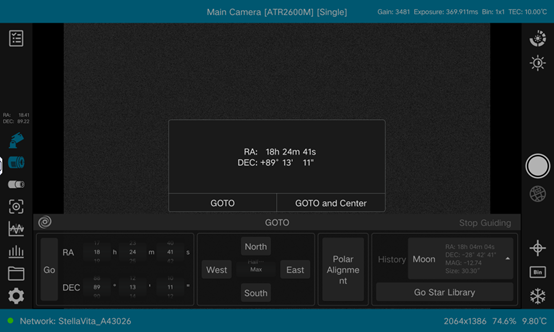
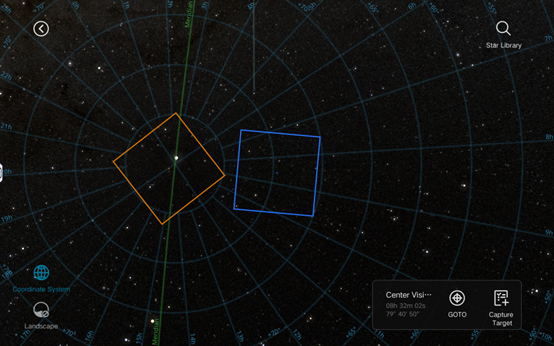
2. Equatorial Mount GOTO Target:
The "Equatorial Mount GOTO" panel provides equatorial mount RD and DEC adjustment, southeast and northwest movement control, as well as polar axis calibration switch and star library entry.
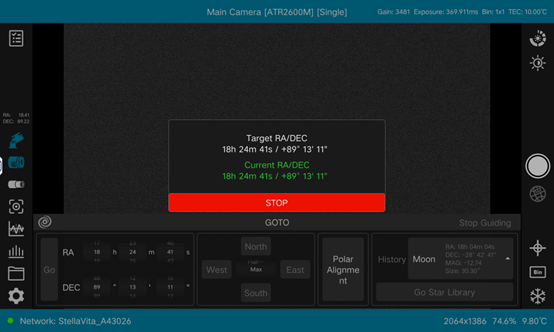
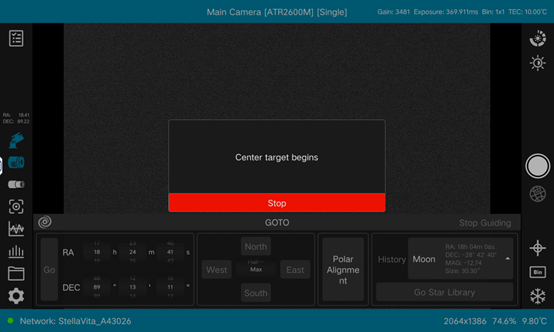
3. Auto Centering:
Automatically initiate centering operations after GOTO. If manual adjustment is needed, repeat shooting, analysis, GOTO operations until the celestial body is centered.
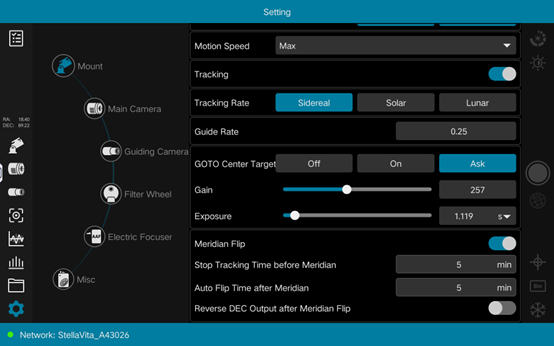
4. Meridian Flip:
When the target celestial body passes through the local meridian circle, automatically stop tracking and initiate a flip operation after a preset delay to ensure continuous and accurate tracking. Before the target celestial body reaches the meridian, the equatorial mount turns off tracking, waits for the set time before starting the meridian flip action. After the meridian flip is completed, the equatorial mount turns on tracking again and simultaneously initiates "Auto Centering" to center the target celestial body.

Guiding
StellaVita’s guiding functions use the guiding camera to capture images in real-time. The system algorithm automatically or manually selects tracking celestial bodies and calculates the celestial body’s offset in real-time, controlling the equatorial mount to make corrections, thereby ensuring the accuracy of long exposure shooting.
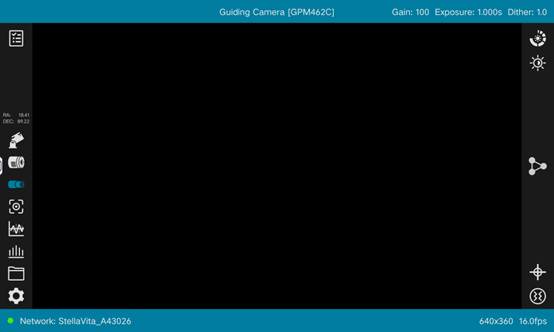
1. Interface display:
The central interface displays StellaVita’s automatically collected guiding camera continuous images or video streams in real-time. The upper right corner displays the guiding camera gain size, exposure size, and jitter coefficient size. The lower right corner displays the resolution of the continuous images and the frame rate of the video stream. The right control bar allows setting the guiding on or off, camera gain, exposure, video stream resolution, and jitter coefficient.
2. Operation process:
① Set guiding camera parameters: The right control bar allows quick setting of the guiding camera’s gain, exposure, jitter coefficient, and pushed resolution size.
② Select tracking celestial bodies: Guiding celestial bodies can be manually selected by long press or automatically selected by the algorithm, with a green rectangular frame displayed around the selected tracking celestial bodies.
③ Execute guiding: Click the right control bar’s guiding button to start guiding (the icon turns blue), StellaVita automatically turns on the equatorial mount’s tracking function to prevent star point trails in the captured images.

3. Guiding Curve
The guiding curve displays images and data information during the guiding process in the form of charts.
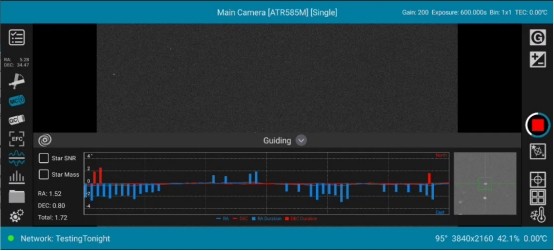
The guiding curve sub-window displays guiding data and curve charts on the left, and guiding status images on the right. The left guiding data and curve charts on one hand show the guiding correction deviation data during the guiding process, including image pixel deviation values Dx/Dy, equatorial mount single move deviation data RA Duration/DEC Duration, star point information Star Mass/Star SNR, etc. On the other hand, it shows the statistical information of the guiding correction deviation, including right ascension, declination, and total statistical root mean square data (in pixels px).
Note:
- Support for enabling jitter function (dithering) during guiding to improve image signal-to-noise ratio and reduce long exposure background streaks, but it may also cause some equatorial mounts to be unstable in guiding.
- During guiding, it is recommended to set the guiding single exposure time to 1 to 4 seconds and use Binning 1×1. For those using small pixel cameras (such as G3M715C), it is recommended to set Binning to 2×2.
Others
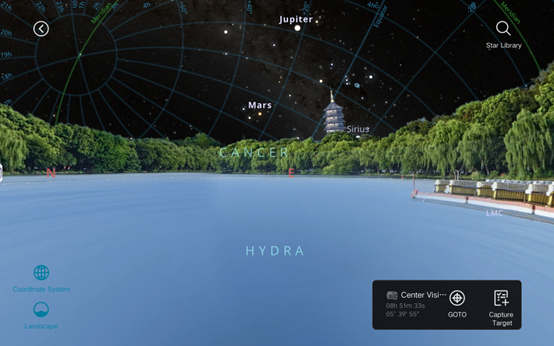
Star Map
Star Libruary
The star library displays all the star data in the star database within the App. It is used
to view star information, search for stars, filter stars, etc.
The functional interface
of the App’s star library
File Browser
The file browser includes three storage locations: the local device, DCIM, and SD card. You can preview and view the images and videos taken in StellaVita, and also edit, synchronize, and migrate them.
This concludes the introduction to the operations and functions of the StellaVita App in
different modes. It is believed that after reading this guide, users will be able to explore
the starry sky more easily and smoothly.
Follow us for continuous updates on practical
tutorials about the astronomical intelligent controller StellaVita.


